Uh, so, where did October go?
*flips through desk planner (in denial)*
And…how are we so close to the end of 2021?
Has autumn flown by for anyone else? It is, by far, one of my favorite seasons. Yet, it feels like it is so short, condensed between summer and winter, that if you blink one-too-many-times it rushes by in a flurry of wind, rain, and falling autumn leaves.

I had a long, beautifully organized list of Halloween & Autumnal Equinox blog posts planned, plus fun and interactive instagram content. And, somehow, while I was picking up squash from the local farmer’s market, the month has nearly gone by! (Don’t mind me… I’ll just file some of these posts away for next year. Recycle a few ideas for use in November, too, while I’m at it. Pay no attention to the writer behind the cobwebs and scarecrows.)
Anyway, that is all to say: How is it only days until Halloween?
Soon we’ll be packing away the Halloween décor in favor of autumn or, before we know it, decorations for the winter holidays. But…. Not yet. There are still a few days left to soak up the magic, to plan your costume, and watch as many Halloween movies as you can get your fill of. Thank goodness, too, because I’m not ready to say goodbye to my Halloween décor quite yet. I haven’t gotten my fill of Halloween movies, either! I still have a few left to watch.
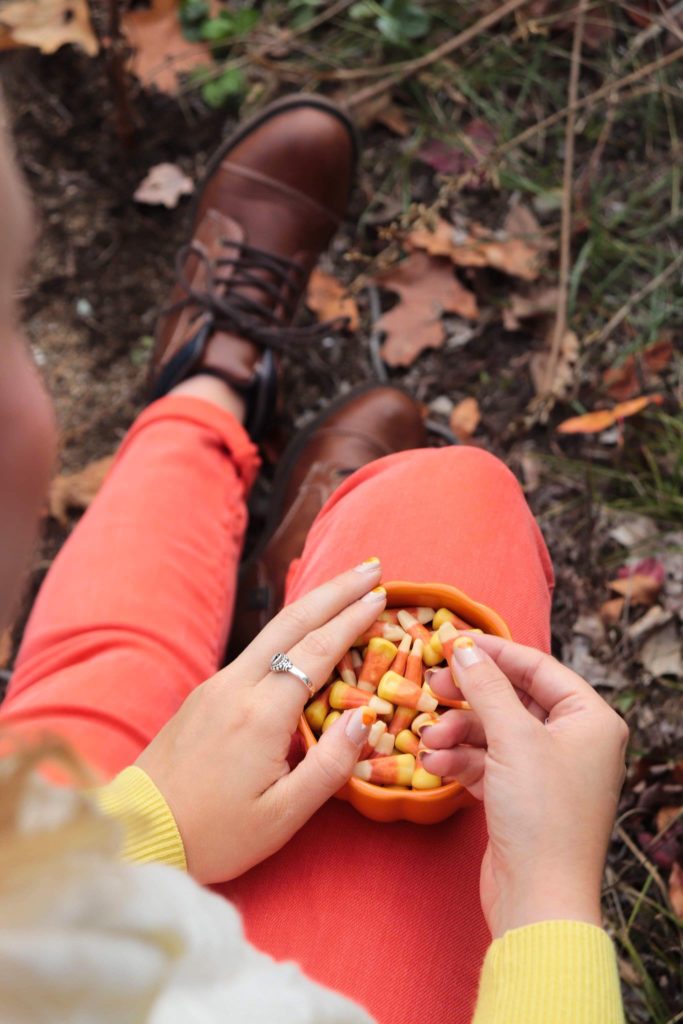
One of the ways I decorate my coffee bar – photos to come in a later post – is decorative bowls of tea, chocolate, ornamental squash, and holiday treats. For Halloween, that festive holiday treat includes little packets of organic, dye/artificial color-free Candy Corn from YumEarth, which I found locally at Target. (They are less for eating and more for decoration; however, they have a delicious vanilla flavor and I do have plans to make YumEarth Candy Corn cookies this weekend for a yummy Halloween send-off.)
What is your favorite classic Halloween Candy?
I’m 100% a chocolate lover and have very few tastebuds that desire any other form of candy. In my trick-or-treating days, I was happiest when I found a Hershey bar, peanut buttercups, kit-kats, or m&m’s in my bag. Skittles, sour patch kids, and starbursts were okay, but, I never really enjoy faux fruit flavors. I’d rather eat the fruit. (Weird child, I know. Listen, one time a man ran out of candy before I got to his house and he felt bad and gave me the only thing he had: an apple. I was just as happy as if he’d given me a chocolate bar. I just love my fruits and veg! We all have our quicks. 😜) According to the Candy Store’s interactive map, I’m not in the majority with this opinion. The map ranks Sour Patch Kids, Starbursts, and Candy Corn are Maine’s favorite Halloween candy. (I may have to break up with my state over its lack of chocolate love.) Despite this ranking, it seems that candy corn is the Halloween treat that everyone either loves or loves to hate. (And I’ve seen more siding on the Loves to Hate! Is Candy Corn the Fruit Cake of Halloween?) .
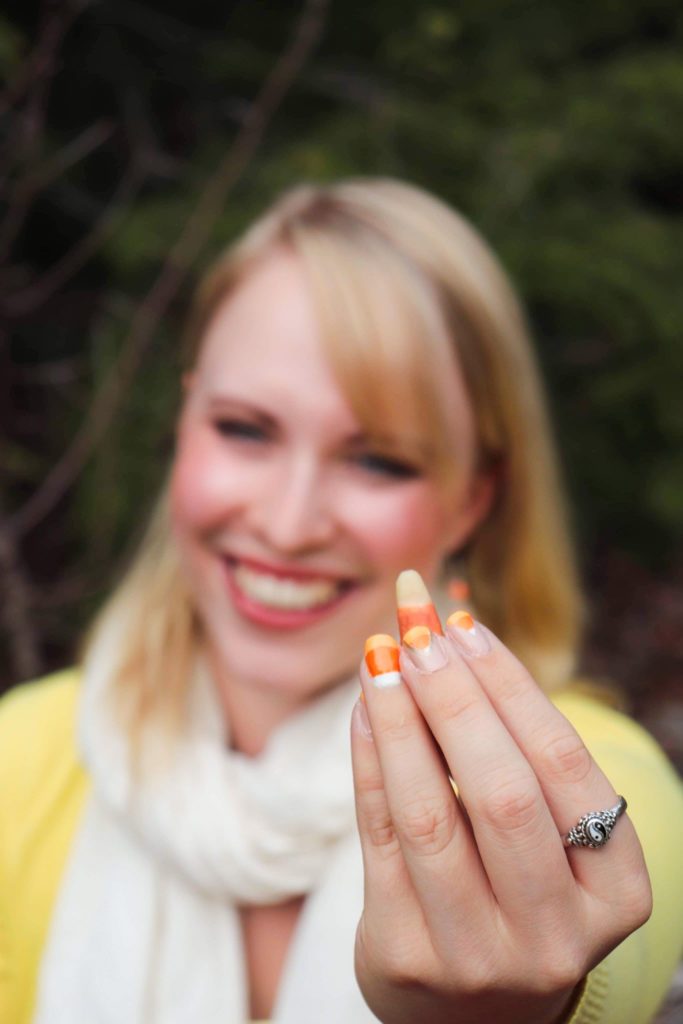
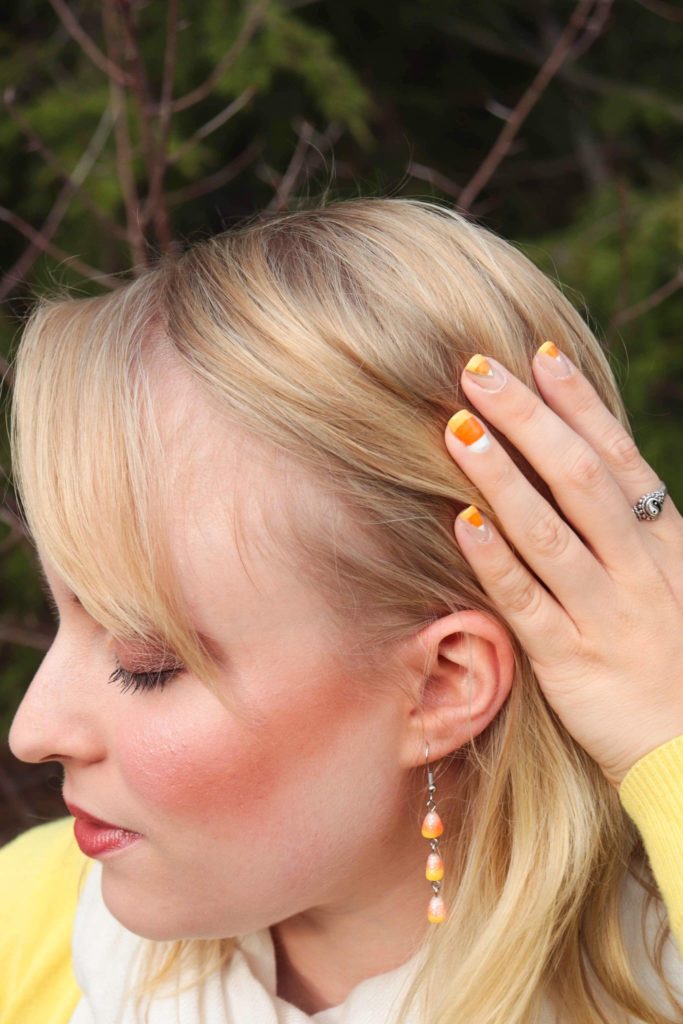
Even if you don’t find Candy Corn the sweet treat that makes your Halloween dreams come true, it is hard to deny the beautiful, colorful, festive fun these orange, yellow, and white candies add to any spooktacular celebration. This Candy Corn themed nail design brings a classy, colorful flare to your manicure that is reminiscent of the Halloween treat. So, let’s get to the nitty-gritty of how you can do it yourself!
Full disclosure – As I am a “use until it is no longer usable” kind of person, some of the nail colors I use may not still be in production. I tend to keep my nail polish around for a long time as long as the quality remains. I’ve tried to add suggestions of replacement colors whenever possible. For any color that you cannot find, you can choose your favorite nude, orange, yellow, white, or gold from your favorite nail polish line. I personally love OPI or ESSIE. I find the color lasts well before chipping and use it as much as possible.
Here’s what I used for Nail Polish:
Nude – Pale to the Chief (OPI)
Orange – The name wore off this one, but I found it on Amazon (Revlon). It is hard to get this color now, but this one from OPI is a great replacement.
Yellow – Check Your Baggage (Essie)
Gold– Brushstroke of Brilliance striping polish by FingerPaints (If you do not have access to nail art polish or do not want the expense, a fine nail brush can be used in your favorite bottle of gold polish.)
White – Alpine Snow (OPI)
Top Coat – Opi Top Coat

Other Supplies:
Vaseline and cotton swabs (optional)*
100% Acetone nail polish remover* and cotton balls / cotton swabs
Nail art brush (optional – if you do not have nail art polish) *
Nail polish thinner (optional) *
Clear tape or nail polish tape
Tips:
* If, like me, you tend to get excess polish on your fingers when painting them yourself, putting a little Vaseline around your cuticles and skin around the nail bed prior to applying polish makes for a much easier clean up at the end. It decreases the need for cleaning up with nail polish remover. If you do not do this, I recommend having a few cotton swabs on hand to dip into the nail polish remover so that you can be more precise with removing polish after your nails are finished.
* I use 100% Acetone because it doesn’t have any dyes or other additives. Historically, I used non-acetone nail polish remover, but I found with the newer gel nail polishes I was having to use more to remove the nail polish. Some days, it was like I was having to bathe my fingers in non-acetone remover and I was not comfortable with that excessive chemical exposure.
* If you use a nail brush, keep a cotton ball on hand and nail polish remover. After you use the brush you can dab it off onto a cotton soaked in nail polish remover to keep the brush clean and pliable.
* The nail polish thinner returns polish to its original consistency, which is great for if nail polish gets clumpy or thick.
Instruction:
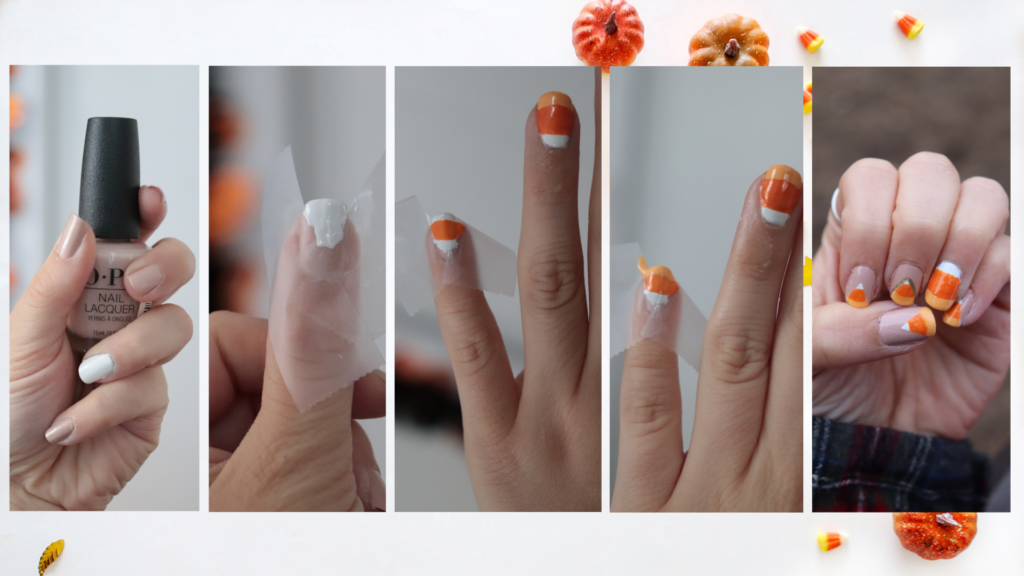
- Apply 2-3 coats of nude nail polish to both hands and 2-3 coats of the white polish to your accent nail. Allow for thorough drying between coats.
- Paint your Accent Nail and allow it to thoroughly dry before continuing.
- The Accent nail consists of three stripes: white, dark orange and yellow.
- The white polish base serves as your first stripe. Paint the entire accent nail white and allow it to thoroughly dry before continuing.
- Either free-handing or using tape for a guide, paint the orange stripe next.
- Free-Hand: Put a good amount of orange polish on the nail brush (not dripping, but not dry). This helps the line be crisp. Too little and the brush marks show, too thick and the line is uneven. To aid in the line being straight, I place the brush on the edge of my nail closest to me and drag in one horizontal motion away from me.
- With Tape: If you are not yet steady with your hand, you can wait until the white polish is completely dry. (You don’t want it tacky or easy to leave an impression on). Take a piece of two pieces of scotch tape (or nail tape) and use them to outline the area of the orange stripe. It should be the widest stripe of the three. Paint the area between the two strips of tape. This is your orange stripe.
-
- Allow this to dry again. The drier it is, the better. Then, slowly remove the tape starting with pulling from the end closest to you, pulling away from you.
- You can then free-hand the yellow stripe or use a piece of tape as a guide.
- Allow for some drying time again, so you don’t smudge the nails.
- Once the nails have dried you can move on to your other nails. To paint the Candy Corn Wedge I formed a V out of tape to use as a guide. (I adhered the tape to my nail so that the two ends of the V fell on the edge of my nail, like a less than symbol: < )
- Use your white nail polish to paint the entire area of the V that guide outlines. Allow this layer to dry.
- Using the Free-Hand or With Tape method from Step 2, paint the orange stripe next. Allow this to dry.
- Using the Free-Hand or With Tape method from Step 3, paint the yellow stripe next. Allow this to dry.
- Once the polish is dry, slowly remove the tape starting with pulling the tape up from cuticle to tip.
- Optional: using a fine nail brush, outline one of the nails with a stripe of gold on either side.
- Once everything has dried, clean up any mess from your fingers with a cotton swab and nail polish remover, add on the top coat, let it dry again, and you’re done! 🙂
If you recreate this design or any of the others I post, I’d love to see them! Post them on your Instagram and tag me in them. For my past Halloween DIY manicures, you can click here for a simple, but cute and classy Halloween Polka Dot design and here for my Just Winging It purple bat design.
Happy Designing!
Xoxo,